Hướng dẫn này áp dụng cho Windows Desktop 10, Windows Desktop 11, Microsoft Windows Server 2019, Server 2022 và Server 2025.
Bài viết cơ sở kiến thức này sẽ hướng dẫn bạn quy trình cho phép truy cập Giao thức máy tính từ xa (RDP) từ một địa chỉ IP cụ thể (ví dụ: 1.2.3.4) trên hệ thống Windows bằng các quy tắc tường lửa được xác định trước mặc định.
Bằng cách sử dụng các quy tắc được xác định trước này, bạn có thể đảm bảo cấu hình phù hợp đồng thời tăng cường bảo mật bằng cách hạn chế quyền truy cập RDP vào một nguồn đáng tin cậy.
Điều kiện tiên quyết:
- Bạn cần có quyền quản trị trên hệ thống Windows.
- Đảm bảo bạn có quyền truy cập tường lửa cần thiết để sửa đổi cài đặt RDP.
Các bước cho phép truy cập RDP từ địa chỉ IP (1.2.3.4 )
Bước 1: Mở Cài đặt Tường lửa của Windows
1.1. Nhấn Win + R trên bàn phím của bạn để mở hộp thoại Run.
2.1. Gõ firewall.cpl và nhấn Enter. Thao tác này sẽ mở cài đặt Tường lửa của Windows.
Bước 2: Sửa Inbound Rules
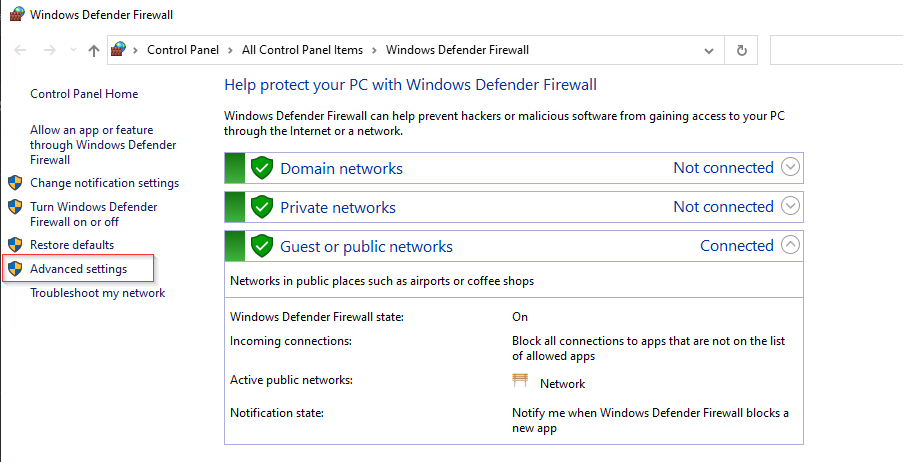
2.1. Trong cửa sổ Windows Firewall, Bấm chọn "Advanced settings" ở màn hình bên trái.
Bước 3: Allow Remote Desktop - User Mode (TCP-In)
3.1. Trong cửa sổ Windows Firewall with Advanced Security, chọn "Inbound Rules" bên cột trái màn hình
3.2. Xác định vị trí quy tắc có tên "Remote Desktop - User Mode (TCP-In)" và nhấp đúp vào nó để mở thuộc tính (Properties).

Bước 4: Thiết lập quy tắc
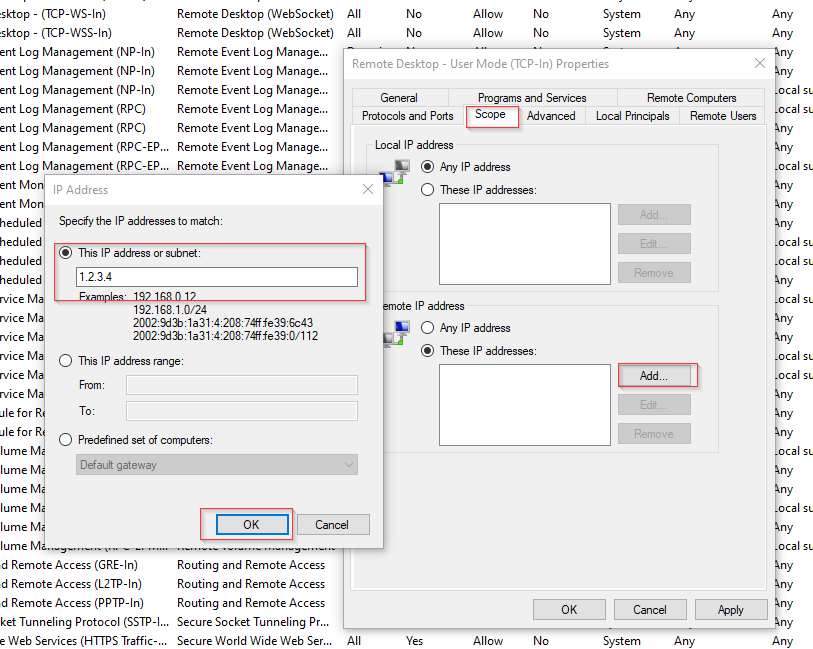
4.1. Trong cửa sổ Properties, chọn tab "Scope".
4.2. Dưới "Remote IP addresses," chọn "These IP addresses."
4.3. Bấm chọn "Add."
4.4. Chọn "This IP address or subnet:" Và gõ địa chỉ bạn muốn cho phép truy cập đến (ví dụ., 1.2.3.4).
4.5. Bấm "OK," và "Apply," và cuối cùng "OK" để đóng cửa sổ Properties.
Step 5: Allow Remote Desktop - User Mode (UDP-In)
5.1. Xác định vị trí quy tắc có tên "Remote Desktop - User Mode (UDP-In)" trong Inbound Rules và nhấp đúp để mở thuộc tính (Properties).
Step 6: Thiết lập quy tắc UDP
6.1. Trong cửa sổ Properties, chọn tab "Scope".
6.2. Dưới "Remote IP addresses," chọn "These IP addresses."
6.3. Nhấp "Add."
6.4. Chọn "This IP address or subnet:" Và gõ địa chỉ bạn muốn cho phép truy cập đến (ví dụ., 1.2.3.4).
6.5. Bấm "OK," và "Apply," và cuối cùng "OK" để đóng cửa sổ Properties.
Step 7: Allow Remote Desktop - Shadow (TCP-In)
Xác định vị trí quy tắc có tên "Remote Desktop - Shadow (TCP-In)" trong Inbound Rules và nhấp đúp để mở thuộc tính (Properties).
Step 8: Thiết lập quy tắc Shadow
8.1. Trong cửa sổ Properties, chọn tab "Scope".
8.2. Dưới "Remote IP addresses," chọn "These IP addresses."
8.3. Nhấp "Add."
8.4. Chọn "This IP address or subnet:" Và gõ địa chỉ bạn muốn cho phép truy cập đến (ví dụ., 1.2.3.4).
8.5. Bấm "OK," và "Apply," và cuối cùng "OK" để đóng cửa sổ Properties.
Step 9: Kiểm tra thử kết nối
Với các quy tắc được xác định trước hiện đã được cấu hình, hãy thử thiết lập kết nối RDP từ địa chỉ IP được phép (1.2.3.4). Sử dụng máy khách Remote Desktop và nhập IP hoặc tên máy chủ của hệ thống đích.